AHF All Hardwood Floor Ltd Est. 2004
AHF All hardwood floor ltd Vancouver based Hardwood floor resurfacing Traditional supply installation repair of Varnished real hardwood floor and stairs Craftsmanship since 1979. Professional Artisan of GYM Gymnasium basketball floor re sanding and finishing repairs and ball puck stick game court markings and painting serving Vancouver, British Columbia.
Dustless dust free hardwood floor sanding...Vancouver, BC
AHF All Hardwood Floor ltd Dustless Dust free hardwood floor sanding. Traditional time honored methods practices and quality built American floor sanding machinery and dust containment systems all work performed by 35 years experienced Swedish wood flooring sander craftsman of local Vancouver hardwood floor re sanding knowledge .AHF sanded wood floors are stunning and exceptional in quality .
Dustless dust free Hardwood Floor Sanding
SKU# DFS0001 wood floor sand only ($2.00per Sqft)
 Industry standard Work Safe BC compliant Hardwood floor sanding
utilizing High Quality American Made Hardwood Floor sanding Machines
and Matching Dust collection containment systems are perfect for all
hardwood locations for on site sanded wood flooring. After all , All
hardwood floors will need to be resanded at some point.
Industry standard Work Safe BC compliant Hardwood floor sanding
utilizing High Quality American Made Hardwood Floor sanding Machines
and Matching Dust collection containment systems are perfect for all
hardwood locations for on site sanded wood flooring. After all , All
hardwood floors will need to be resanded at some point.
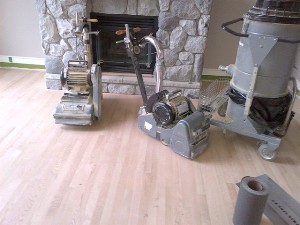
AHF's Ken has a great advantage sanding wooden floors with our Cadillac's sanding machines the Clarke American Twelve floor sander, Simply put the best twelve inch floor sander machine, "the Cadillac of the hardwood floor sander industry". When a stain color is required the twelve can be followed by an Clarke American Floor crafter eight inch Belt Machine the best eight inch belt machine ever made.
Our floor sanding process involves rough angle sanding Most hardwood floors will require to be rough sanded especially the plain sawn or flat grain planks and strips, parquet floors fore sure. three to four sanding passes are required and i will usually do the edging perimeter floor sanding three times around, The sanding passes are a complete once around the whole floor with rough medium and fine sanding grits. Full trowell flood filling in between sanding and graduate sanding to a fine one hundred grit or double oo . Sand with a sanding screen to burnishing with a polisher after hand sanding all the short ends and lengths and this hardwood floor surface is ready for the next process either staining the hardwood floor a stain color or a variation of a natural clear(transparent) or natural opaque(pastel ) keeping the wood floors light as possible and leaving the future repair touch-up or maintenance options open for many years down the road, such as screen and recoating to renew the original sparkle and shine. This is what sanding the floor is all about preparing for the finish.
- Description
-
AHF-Allhardwoodfloor ltd offers a wide range of wood floor sanding expertise. quality wood floor ceramic, zircon and silicone carbide sanding paper. Allhardwoodfloor is ready for your next hardwood floor sanding from a small set of stairs to the largest ballroom or gymnasium hardwood floor we can prepare the surface to finish in a variety of styles and colors
Hardwood floor sanding is an on location service, Let us come to you we will be bringing the best hardwood floor sanding machinery and sanding tools maintained to make my life easy and your floor look fantastic from there its all about the passion, patience, perseverance, skill knowledge of master craftsmen floor layer Ken Moersch to bring alive amazing wood floor results on your hardwood floors, stairs or gym flooring.
- Additional Views
-
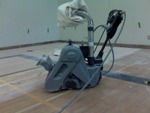

.jpg)
AHF-All hardwood floor ltd able to engage a broad range and wide variety of surface areas for refinishing resurfacing restoring and more, American Hardwood floor sanding machines: Clarke American twelve, Clarke American eight belt, Clarke Gym Floor Rider.
- Requirements
-
Please be aware of the following!
Hardwood floor sanding machine and tools require 220 Volts at 30 amperes.
Gym floor rider setup needs a 90 amperes breaker 3 phase 208 or 480 volts.
- Heat and light: The home or dwelling must be heated and light well.
- Airflow: In order to ensure the maximum paint shop out come must have control of airflow, ventilation, foot traffic ext.
- Pick an appointment when there is nothing else going on if possible. Excavators working on the roadways causes vibrations in turn cause dust to flow. Painters or roofers working outside can also interfere with getting quality finishing results.
- Pilot lights and gas may be shut down if necessary.
- Floor sanding machine summary reviews
-
 These
types of professional dust containment hardwood floor sanding
machines are not available as a rental tool, that is an easy 8
by Clarke its 110 volt job. weighs about 100 lbs. Same thing the
edger sander is the more crucial element, the rental shop have a
rental version that turns 400 times/minute slower than the B2
Pro.Voted
The Hardwood flooring industry's number 1 belt floor sander is
the Clarke American Floor Crafter approximately 250 lbs with 4
horsepower 230 volt sealed engine. The smaller more portable
profile can turn on a dime and is stable when caddying thick
vacuum hosesAmerican
Clarke twelve inch sander machine is 7.5 horsepower 230 voltage
and 320lbs. Called the Cadillac of the flooring industry, the
hundred something year old patent still rated the Number 1
hardwood sanding machine in the world.
These
types of professional dust containment hardwood floor sanding
machines are not available as a rental tool, that is an easy 8
by Clarke its 110 volt job. weighs about 100 lbs. Same thing the
edger sander is the more crucial element, the rental shop have a
rental version that turns 400 times/minute slower than the B2
Pro.Voted
The Hardwood flooring industry's number 1 belt floor sander is
the Clarke American Floor Crafter approximately 250 lbs with 4
horsepower 230 volt sealed engine. The smaller more portable
profile can turn on a dime and is stable when caddying thick
vacuum hosesAmerican
Clarke twelve inch sander machine is 7.5 horsepower 230 voltage
and 320lbs. Called the Cadillac of the flooring industry, the
hundred something year old patent still rated the Number 1
hardwood sanding machine in the world. - Wood floor sanding Instructions
-
INSTRUCTIONS SANDING A NEW STRIP OR PLANK WOODFLOOR
Load the drum sander with a coarse grit to medium
grit sandpaper ( #3 or #4). Place the machine
along the right hand wall (unless making an angle
pass as described in TIPS #5 through #7), with about
two-thirds of the length of the floor in front of you.
Start the motor with the drum raised off the floor,
walk slowly forward at an even pace and ease the
drum to the floor. As you near the wall at the end of
the pass, gradually raise the drum off the floor.
Practice before turning on the machine.
Cover the same path you made on the forward cut
by pulling the machine backward and easing the drum
to the floor as you begin the backward pass.
When you reach your original starting point ease
the drum from the floor. Move the machine to the left
side approximately three to four inches. Then repeat
the forward and backward passes and move to the
left after completing each set of passes. You will only
sand a 3” to 4” wide strip of un-sanded area with each
set of passes. When the two-thirds area of the room
is sanded, turn the machine in the opposite direction
and sand the remaining third in the same manner.
Be sure the sanding passes made in the one-third
area overlap the first passes by two to three feet. This
blends the two areas together.
After completing the first sanding operation, or
“cut”, with the drum sander, use the edger to sand
along the baseboards, up to corners, in closets, and
other areas the drum sander did not reach. With new
flooring, which is relatively smooth, use the next grit
loading slot, turn the drum a full revolution and
slip the other end of the sheet into the slot. Tighten
by turning the nuts at both ends of the drum. Don’t
over tighten and over-compress the drum rubber,
which stresses sanding paper, widens slot, and
increases chatter. Some sanders may take sanding
sleeves or belts. Others may have a clamp to hold
paper on the drum. ALWAYS UNPLUG sander when
changing paper.
Rough sandpaper that will be used on the drum sander.
With old flooring it may be necessary to use the same grit
paper as the first drum cut to remove old finish or level abused areas.
Many professionals will rum a rough cut on a 45 degree angle.
If a medium grit cleans and sands the floor completely,
use it for the first cuts. If extra passes are required
to clean and level the strips go back to a more coarse
grit paper. The first cut with drum sander and edger
should produce a level, completely sanded floor (with
corners and obstructions to be scraped later).
All following sanding procedures cuts passes merely
remove the sanding
When using the edger move in an easy quarter-
Never let the sanding drum touch the floor unless
you are moving the machine forward or backward. If that
happens you will cut a hollow (celery stick)in the floor that is difficult
to remove.
Circle pattern at end walls overlapping into the drum
sanded area 4”-6”, and following the direction of the
grain, to some extent.
Do not try to make the edger cut more aggressively by putting extra
pressure to the front.
This merely makes ridges and grooves which are hard to remove and damages the edger's pad by making it torpedo shaped
Along walls parallel
After drum sanding the floor with a coarse grit
sandpaper. For the edger, use fine grit sandpaper. If
coarse was used on the first cut use medium grit and
follow with fine grit on the edger. Complete the sanding
operation using the fine grit sandpaper on the drum sander.
Generally, filling of nail holes, blemishes, cracks,
commercially prepared wood flooring filler. Some
fillers may need coloring or may not take a bleaching
operation; check with the supplier or manufacturer.
Also, it may be necessary to trowel fill the entire
floor, particularly an old floor, due to the extent of
cracks between strips. Multiple character marks foun
in #1 and #2 COMMON Grades which are fill able
grades may also require trowel filling. Trowel fillin
should be done before the medium or final sanding
cuts. Let the filler dry thoroughly before proceeding
with the sanding. (Overnight is best.)
When drum sanding and edging are completed
proceed to hand scrape and then hand sand corners
and around doors and other cased openings. Also hand
sand the perimeter edges. Use the same grit as the
last cut. Using a sanding block or electric oscillating
sander can facilitate the hand sanding process. If
staining the floor a dark color, the electric oscillator
may leave egg shaped marks which will show in th
stain. Hand sand these out or do not use the oscillator
When using a hand scraper apply even pressure,
scraping in the direction of the grain. Avoid gouging
the wood with the scraper. A brick with a piece of old
blanket glued around it makes a good sanding block.
Sand about 6” into drum sanded area. Always sand
and scrape in the direction of the grain along the
length of boards.
A hand scraper is used where the edger does not
reach, and to remove old finish in tight spots
Always scrape in the direction of the flooring grain.
Then hand sand or oscillate scraped area.
Strippe
such as under radiators or between stair banisters or railings
Using a sanding disc (one grit finer) or screen disc (same
grit as fine cut) on the buffer over the entire floor can
also improve blending of edged and drum sanded
areas.
Move buffing machine back and
forth with the direction of flooring boards.
the fine sanding cut with 80 grit sandpaper leaves
the wood fibers open and enables more stain to penetrate,
producing a deeper shade and more uniform
appearance. An option is to screen with an 80 grit
after the fine sanding cut, particularly if the fine cut
was 100 grit. Use of the buffer and screen increase
the risk that circular scratches will show if a dark
stain is applied.
Three sanding cuts followed by screening or disking
is the recommended procedure and will provide a uniform
surface for most all standard finishes. Two cuts
followed by the screening or disking operation may be
sufficient but may produce a more coarse surface and
is considered a minimal sanding procedure.
SANDING PARQUET, BLOCK AND SIMILAR
PATTERNED FLOORING - Use the drum sander
and edger for two sanding cuts. With the first cut do
not sand directly across or with the pattern but alway
on an angle. Start the first sanding cut diagonal to
the grain using a medium grit sandpaper. Then use
a final fine cut with the room’s longest dimension.
REFINISHING AN EXISTING FLOOR - Most
refinished a number of times. Thinner wood floors,
solid or engineered - 1/2” or 3/8” thicknesses - should be
refinished with caution because repeated sanding
can wear down the groove edge, causing breakage or
wear through to reveal nails and professional wooden floor sanding is recommended.
To determine the floor thickness remove a floor
heating register or the shoe mold and baseboard so
that an edge of the flooring can be measured.
When refinishing floors, remove as little of the
surface as is absolutely necessary. This is particularly
true with veneered and thinner floors. On square edge
strip flooring that is face-nailed, all nails must be
driven slightly below the surface of the wood to permit
sanding.
The following instructions apply to standard 3/4”
strip, plank and block floors and, with the cautions
just mentioned, to the thinner materials.
Sanding. It may be necessary to use a very coars
“open coat” paper to remove the old finish. The heat
and abrasion of the sanding operation make the old
finish gummy and may quickly clog normal sanding
paper. First try regular paper (particularly on a
diagonal). If 90% of the finish is removed and the floor
is generally flattened, coarser grits are not necessary.
When you get down to new wood use
the same procedures and grits as previously described
under “Sanding a New Strip or Plank Floor”. If th
old floor has been painted several times it may be necessary
to use paint remover to uncover the wood surface.
The number of sanding passes required for
“Refinishing” will be largely determined by the condition
of the old floor and the thickness of the finis
being removed. If the surface is in very good shape,
with only light scratches and few dents, and has no
build-up of old finish and wax, one pass with the disc
sander and fine paper may be sufficient. Be sure all
the old finish is removed.
If the floor has been abused, scarred or dished, use
as many cuts as are necessary to get a smooth,
unblemished surface. If badly scarred and abuse
boards have not been repaired, it may be advisable
to leave some blemishes in the floor or too much
sanding may be required.
With a floor that is in fair condition, make the first
cut at a 45°± angle to the flooring direction with
medium grit paper to level the floor and remove 90%
of the finish. Then follow the instructions given for
sanding a new floor on the succeeding cuts. Use the
same grit paper as was used on the 45° cut for the
first cut parallel to the flooring strips.
PREPARATIONS FOR FINISHING
IMPORTANT: Allow ample time with the sanding
procedure to apply the first coat of stain
or other finish the same day that sanding is
completed. This prevents a raised grain condition
which creates a rough surface.
When machine and hand sanding are completed
sweep and vacuum the floor. Wipe up and/or vacuum
all dust on windows, sills, doors, door frames, and baseboards.
and nail holes with a commercial flooring filler, applied
Sparingly with a putty knife. When dry, hand sand
with fine sandpaper, same grit as final sanding.
IMPORTANT: Check with finish manufacturer or
Supplier to make sure fillers are compatible with
Finish materials.
For future re-finishing, it is essential to know the
brand names and color of the stain and other wooden floor finishing
products or coatings used, or if the floors were prefinished at the
flooring manufacturing plant.
FINISHING
Immediately after sanding is completed the
finishing process should begin. This process involves
applying a protective coating and a color, if desired,
to the flooring. Finishing produces a uniformly
enhanced surface and seals the wood to make it less
absorbent to moisture and foreign materials.
GENERAL TYPES OF FINISH MATERIALS
finish and use only compatible products.
Compatibility questions between different
materials should be referred to the finish manufacturers
Always follow ALL of the manufacturer’s safety precautions,
especially for skin contact, ventilation, breathing apparatus, fire hazards
and disposal
- .